Contributing Writer: Michael Ann

Hello everyone!
I’m Michael Ann, from the blog Michael Ann Made
where I love to share my crafting, sewing, and knitting projects and tutorials.
I am so excited for the chance to share a New Year’s DIY with you today!
This is the perfect time of year to get organized,
and organizing for me means new cute bins to put things in!
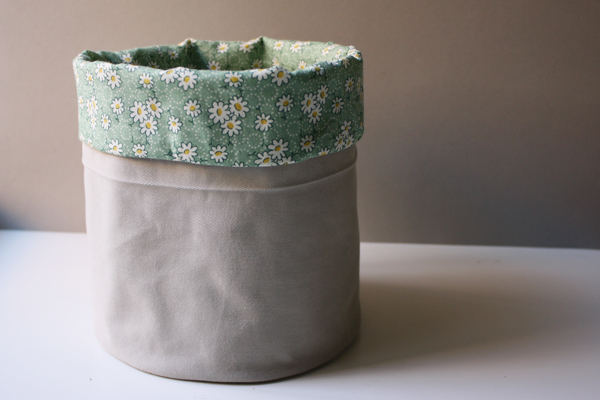
For that reason I created a Fabric Bucket Tutorial for you today.
It’s a quick and simple project, perfect for even the most timid seamstress.
So let’s get sewing!

Materials you will need:
1. 3 Circles cut to the size you want your bucket.
Cut one circle out in the lining, outside fabric, and heavy-duty interfacing.
2. 3 Strips cut to the circumference of the bottom, and height you want your bucket.
Cut one strip out in the lining, outside fabric, and medium weight interfacing.
3. You will also need a sewing machine, iron, scissors

Now to make it!
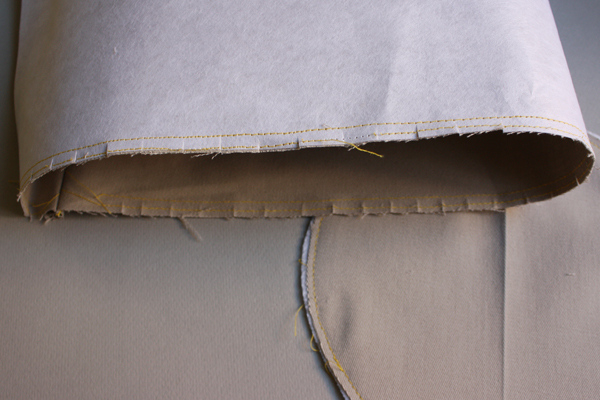
1. Sew the side piece into a tube.
Baste the interfacing onto the outside fabric tube and circle, stitching a little bit inside the seam line.
On the tube, make clips every half an inch or so, making sure not to cut through the basting.

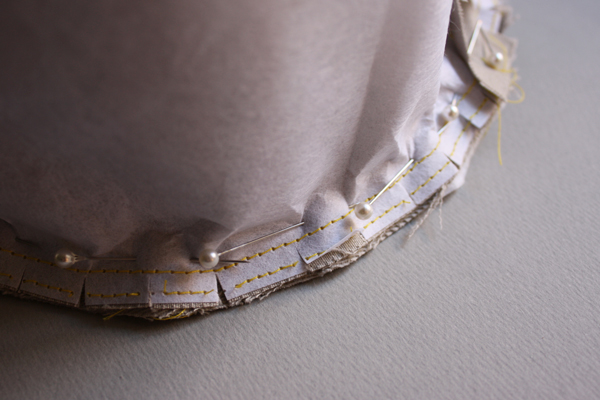
2. Pin the tube to the bottom circle, right sides together.
The clips should allow you to follow the curve of the circle.
After it’s all pinned, sew it up!

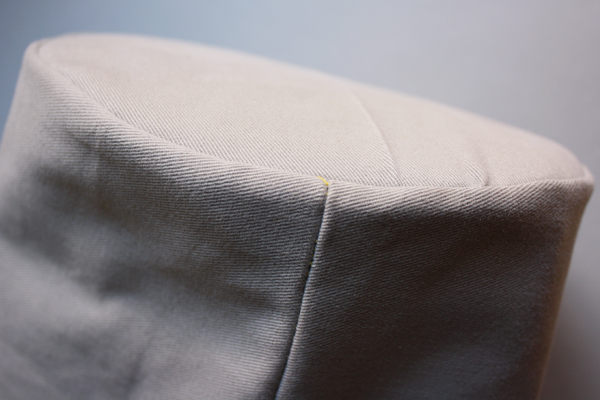
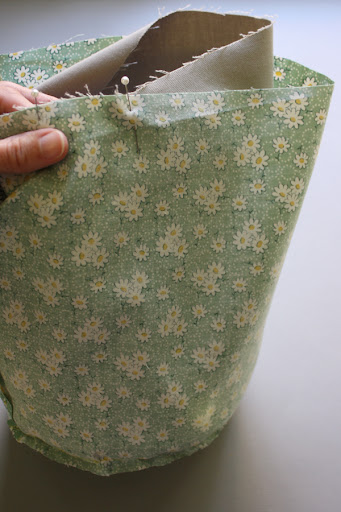
3. Flip it inside out and this is what it should look like!
Now sew the lining sides to it’s bottom in the same way.

4. With right sides together, sew the top of the lining to the top of the outside,
making sure to leave a couple of inches, wide opening.

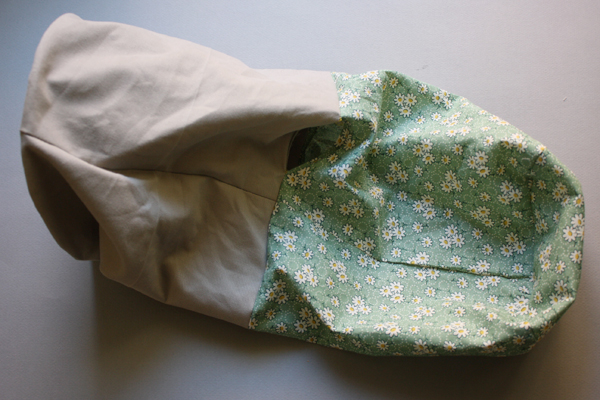
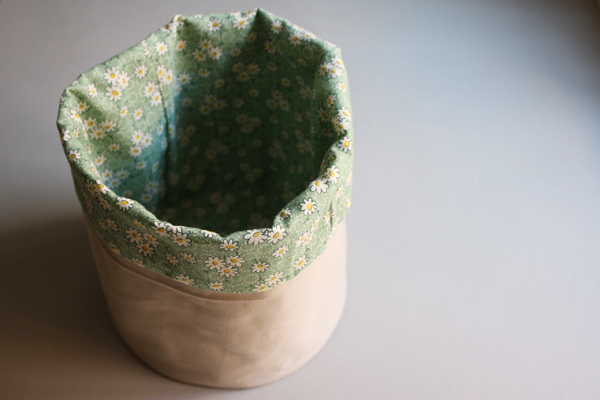
5. Flip everything inside out, and then push the lining into the bucket.
Sew up the opening, fold down an inch or so of the top, and you’re all set to go!

I hope you enjoyed this little tutorial,
and I hope that you all have a fabulous time crafting for the New Year!
Be sure to stop by MichaelAnnMade.com anytime to say hello,
and thank you Mari for this chance to be a part of your site!


Wonderful bucket! I too have been trying to get my craft world contained making bags and baskets. This is a perfect time of year for it.
–Denise at Sly Needle
Denise,
Thanks for stopping by and sharing. I need to go check out your crafty cuteness at your sight.
Michael Ann, thanks for inspiring us to create with this lovely project!
Perfect! My aunt has been looking for something to keep her yarn in. I am going to try to make this as a gift. Wish me luck! Thank you for sharing!
Jen,
I love hearing how people use our crafts or how our articles inspired them. Thanks for taking the time to stop by and share!
Love the bucket, so cute, I love to sew so I will be making one. Kind find all kinds of ways of using them throughout the house. Love the tutorial. Thanks for sharing at Sunday’s Best.
I know right, so many ways to use it. Enjoy!
This bucket is adorable!! TFS!! Stopping by from So Creative linky party and your newest follower.
Here is what I shared this week: http://craftybrooklynarmywife.blogspot.com/2012/01/hollys-first-coat.html
Alisha,
How fun a coat for your pup! So glad to have you following along!
This is a great tutorial! Thanks for showing how you attached the round bottom. I’ve always struggled with that.
(Stopping by from Everything Under the Moon)
Libby,
I know Michael Ann did a great job at showing us how to do it! Always so very helpful esp. for me who needs lots of help when it comes to sewing.
I can think of so many things to use this for! Thank you so much for sharing this!!!
That looks great! Karima
Karima,
Yes, Michael Ann did a great job!
I just hopped over from Transformation Thursday because I have been wanting to make one of these for a while now… thank you for the great tutorial! t.xoxo
Theresa, I love to hear from our readers how we helped them be creative. Thanks so much for stopping by and sharing!
My current post is one of these, too! I didn’t line mine, but used a stiff innerfacing
.
That is such a cool idea! Thanks for linking up to this week’s Catch a Glimpse party. I’ll be featuring this tomorrow.
Thank you for this tutorial! It made a perfect bucket to put on my changing table in the baby’s room to hold diaper supplies. You can see a pic at my blog, http://www.simplejoycrafting.blogspot.com.
Casey
This could be used for so many different things! Thanks for sharing!
Nice job on this! I’d love to have you link it up to my party at http://scrapbookingez.blogspot.com/2012/01/couple-weekend-getaway.html. Thanks for sharing!
Love it so I pinned it! Thanks for linking up at Creative Bloggers’ Party & Hop
Cute! Thanks for sharing at Shine on Fridays!
Oh I have visions of fantastic cloth buckets, and all their genius uses! Thanks for the great tutorial! I’d love if you’d come and share this at the Head to Head Showdown, going on right now at http://www.icantstopcrafting.blogspot.com ~Jen
p.s. Feel free to link up any other projects you might like to show off a bit!
super cute. I need one of those!
This looks like a fun project I would like to do.
Love this. I can think of at least a dozen uses for these. (saw your post on Marvelously Messy)
Thank you so much for joining JAQS Studio’s Linky Part. I featured your project today
.
-Q
Great job on the bucket! I featured you
I hit enter to quickly! Lol! I featured your bucket on Sew Woodsy yesterday!
Too cute and I love how easy you made it look! Just pinned this for when I learn how to sew
Thanks for sharing at Taking A Timeout Thursday!
Super cute idea, love it. going to try this, thanks for sharing.
Love it-Thanks for sharing a Feathered Nest Friday!
You truly constructed a number of fantastic tips in your article, “DIY Fabric
Bucket | Inspired By Family Magazine”. I may possibly be coming back to
your page shortly. Thanks -Marcela
I needed to present this specific post, “DIY
Fabric Bucket | Inspired By Family Magazine” along with my personal buddies on facebook.
Isimply just wanted to spread your terrific publishing!
Thanks a lot, Aaron